Saturday, May 2, 2026
Home Blog Page 3

Google Search Indexing Issues Started on 31st January to February 2024

0

If you are experiencing indexing issues of your website then you are not alone and many publishers across all over and mostly publishers from india reported indexing issues and incident were reported and google confirmed there is an issue with google indexing and identified the issue and working on fix and update google search status dashboard officially and updating indexing incident status for every 12 or 24 hours on Google search status dashboard.

Google is experiencing an indexing issue and if your website articles or pages are not indexing then you need to wait for sometime until google fixes the issues.

Note that this indexing incident issue affects only a small number of sites and this doesn’t mean google will not index at all, it will index website pages but it will index slower and google identify root cause on 31st January 2024 and update google systems with fix.

Google Confirmed Indexing Bug or Indexing issues

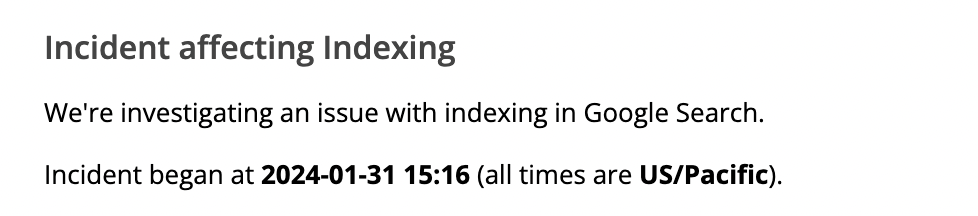
After many people reportedly reporting on incidents their website is not indexing and facing indexing issues then google started looking into that and identified indexing incident and officially confirmed on google search status dashboard.

When Did Google Indexing Issue Occured in 2024

On January 31 google identified issue with indexing and this was reported by lot of many publishers experiencing issues and the issue indexing issues started on 31st January and not all publishers experienced this issue and few website publisher are effected and few are not notably affected.

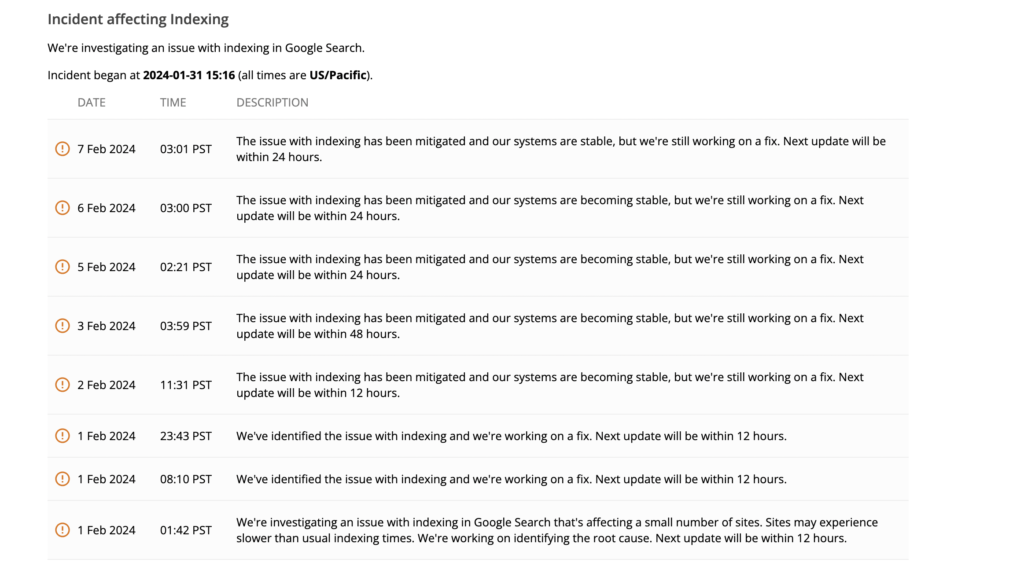
On January 31st 2024 –  Google identified issue with Indexing and identified issues and working and started working on fix from February 1st 2024 and updating google search status dashboard for 12 hours.

On 2nd February 2024 –  Google announces – Google updated indexing issue “incident as issue has been mitigated and google systems are becoming stable” and next update will be in 12 hours.

On 3rd of February – Google updated indexing incident as the status is same but they are stil working on fix and next update will be after 24 hours.

On 5th of February – Google Updated indexing incident as – the same and its mitigated and working on fix next update will be within 24 hours.

On 6th February – Still the issue is the same “The issue with indexing has been mitigated and our systems are becoming stable, but we’re still working on a fix. Next update will be within 24 hours.”

On 7th February – Same indexing issue status “The issue with indexing has been mitigated and our systems are becoming stable, but we’re still working on a fix. Next update will be within 24 hours.”

Create QR Code for Pages & Post using Plugin in WordPress

0

On your wordpress website if you want to generate qr code for pages and posts and want to use qr code functionality to your wordpress posts and also for pages or it can be your shopping cart website or it can be any pages then you can use qr code for wordpress by installing qr code wordpress plugins and use qr codes on wordpress websites. So, lets see in detail below.

You can display and create QR code on wordpress pages and post using variety of plugins available on market like Kaya QR Code wordpress plugin, QR Code Generator, WP Qr code generator and many other plugins in wordpress makes it easy to display or create qr codes on wordpress pages and posts.

But sometimes, you may want to generate qr code dynamically displaying it on shopping code and you can use UPI QR code and shopping cart qr code generators available on wordpress plugins for free and paid versions.

Create QR Code for Pages & Post using Plugin in WordPress

Follow below methods and generate QR code on your wordpress posts and pages or shopping cart and send users to the page or post that you want using QR Code.

Step 1: Login to your admin dashboard

Step 2: Go to Plugins section and Click on Add New Plugin

Step 3: In plugin search bar search for  – shortcode ultimate and hit enter

Step 4: Now, click on install and wait for shortcode ultimate plugin to install on your wordpress website.

Step 5: Now, Activate Shortcode ultimate plugin on wordpress website.

Step 6: Now, Click on Add New Pages or posts on your wordpress and click on Plus icon (block code) and click on shortcode.

Step 7: Now, you will get a new shortcode block and then click on the brackets icon option – which is shortcode ultimate plugin.

Step 8: Select QR code option from the list of shortcode items here and click on QR code option – you can also use search box and search for qr code here and click on it.

Step 9: QR code shortcode settings will pop up and you need to fill data here (by default it will populate all data that you want to need almost.

Step 10: In the Data field enter the url for the QR code where the user wants to go after scanning the QR code.

Note: You can use variables here by clicking on %current_URL%  and Permalink option here and display QR code accordingly.

Step 11: In Title field – enter title of the QR code here

Step 12: Enter size of the QR code and use slider here and select size of the QR code and select Margin and Design QR code, Align, change color of QR code.

Step 13: Enter link in link field and this will display for user in front end and link will be clickable.

Step 14: Select the link to open in a new window or same window by selecting link target options.

Step 15: Once you change and enter all fields of QR code then mention all data fields to Generate QR code then click on Insert Shortcode option and it insert QR code shortcut.

Once you create QR code using shortcode ultimate then go ahead and visit front end of the page and you will see QR code and once you scan qr code then it will go to the destination link that you have created.

That’s it, this is how you create QR code on wordpress website posts and pages and then display it in the front end using shortcode.

Can i Modify Shortoce QR Code Code on WordPress Website?

Yes! If you have created qr code using shortcode ultimate plugin then you will be able to change qr code url by going to qr code shortcode inserted page and change the data url here and save and insert qr code shortcode.

Add Google Search Console HTML File Upload on WordPress

If you are trying to verify your WordPress website with google search console with html file upload method of your WordPress website then you can easily download .html search console verification file from google search console and upload html file on your root directory of your WordPress website.

To upload html file verification method of search console and verifying your website you will need access to ftp or cPanel and then upload html file to your root directory of your WordPress website.

You need to download the search console html file to your local system and then upload the html file to the root directory of your website.

Add Google Search console html file upload on WordPress

Follow below methods and download google search verification html file and upload it to your server root directory.

Step 1: Login to your search console with higher privileges

Step 2: Click on Left side drop down menu and click on Add Property

Step 3: Enter your domain name here – url prefix and click on continue

Step 4: Now, Click on html file upload

Step 5: Click on download the file and download html file and download it to your computer

Step 6: Now, login to your website cpanel or login to your wordpress files using ftp.

Step 7: Upload the file into the root directory of your website : if your website is domain dot com then you need to upload the file in domain dot com slash verification file upload here.

Step 8: Once you upload a search console html file upload to the root directory, then go ahead and click on verify.

Step 9: Click on Verify and wait for the search console to verify your website, if google detects search console html file upload then verification will complete successfully.

Thats it, this is how you upload html file upload on wordpress website in root directory and verify search console on wordpress website.

Also Read:

1) How Do I Add Google Search Console Verification HTML Tag in WordPress?

2) Why WordPress Too Many Redirects After URL Change

3) Change Author URL in WordPress and Base Author URL

4) Fix WordPress Not Working With PHP 8 Update?

5) How To Add or Link Email Address In WordPress Posts or Pages

Where to Upload Search Console HTML File Upload on WordPress

If you want to verify the search console using html file upload then you need to download the html file and upload it to your root directory of your wordpress website – where ads.txt sitemap.xml, where Robots.txt file lives on your root of your wordpress folder on server.

Search Console Verification Fails HTML File upload method

If search console file upload verification fails then make sure that you are uploading downloaded verification file in root directory and allow google bot to access the page and clear cache of your WordPress website and if you are using Cloudfare then check with cdn settings.

How Do I Add Google Search Console Verification HTML Tag in WordPress?

If you are on wordpress website and wondering how to keep search console html verification html file and verify google search console then its pretty and easy and all you have to do is grab the html verification meta tag from google search console and update search console meta tag verification in wordpress inside head tag.

Google search console verification html file tag is pretty simple and its pretty easy and once you verify your website ownership on search console then you need to do is grab html eta tag and then place the html meta tag on your wordpress website and verify search console with your website using search console html tag.

There are several ways you can consider verifying search console with your wordpress website like search console file upload, html meta tab, google analytics tracking code, Google tag manager, Domain name provider, DNS, blogger sites.

Add Google Search Console Verification HTML Tag in WordPress

To add google search console verification tag you will need to have full access to the search console and then add your version of your property and get html meta tag verification.

USE HTML Meta Tag for Search Console Verification

Step 1: Open the search console and login with your details.

Step 2: Click on Top left side under google search console logo and click on Add Property

Step 3: Enter your website url prefix here and Click on Continue.

Step 4: Expand Drop down HTML Tag Verification here and copy html meta tag to your local computer.

Step 5: Login to your wordpress website ftp or cpanel

Step 6: Navigate to folder -> wp-content / themes / header .php file and open it

Step 7: Copy and paste the search console verification html tag in head tag and save file.

Step 8: Refresh your website on chrome browser and then go to the search console and click on verify.

Step 9: Once google detects search console html tag on your website then google search console will verify your website using html meta tag.

That’s it, this is how you verify search console using html meta tag verification on your wordpress website.

Also Read:

1) XML Sitemap couldn’t fetch error in Google Search Console

2) How to Fix Pages Not Indexed Status URL in Google Search Console

3) How to Fix Discovered currently not indexed in Search Console

4) WordPress Install Plugin Without FTP

5) How to Enable Debug Mode in WordPress

Where to keep Search Console Verification HTML Tag on WordPress Website

You need to go to wp-content – theme folder and then open the header file of your wordpress website where all meta tags are placed inside head tag and simply copy and paste html meta tag of search console in head section and verify search console after updating html meta tag.

WordPress Not Detecting Search Console HTML tag Verification Method

If search console is not detecting or not reading html tag on your WordPress website then make sure that you have placed html tag correctly and if you are using any cache plugins on WordPress website then you need to clear cache of WordPress website and dont block google bot.

Why WordPress Too Many Redirects After URL Change

0

If you are getting too many redirects error on your WordPress website after changing url then there is an issue with the htaccess redirection file and you need to cross check with the redirections implemented on your website.

Why WordPress Too Many Redirects Error Occurs?

Too many redirect on wordpress or any website occurs due to misconfiguration and if redirects in htaccess are misconfigured or redirects implemented incorrectly then redirect loop occurs and with ssl certificate redirects also cause this too many redirect errors on website.

Why Too Many Redirects Error Occurs

Htaccess file is responsible for redirection errors or to do redirects on website on server side and if htaccess is not implemented correctly then redirections issues occurs and if site url is changed and you have implemented redirections in htaccess incorrectly then you need to implement redirects properly.

Due to cache plugins or cache mechanism implemented on your website then due to cache issue also you can get to see too many redirects error and you need to clear cache of your website and check and try in incognito mode of browser and see.

Due to php code tweak or code not written properly can also lead to too many redirect error occurs.

Fix WordPress Too Many Redirects After URL Change

Follow below simple methods to fix too many redirect errors.

Check Htaccess File

You need to cross check and review your htaccess file of your website and see if there htaccess server side redirect and force www redirections in htaccess code with 301 redirects.

SSL Certificate Redirection Issues

Every website has ssl certificate and all www, non-www, www, http should redirect to one final httpS version of your website and if ssl certificate redirections are not implemented correctly then too many redirection error loop occurs or you will see ssl certificate not secure and other errors as well.

Due to Incorrect htaccess code

If htaccess  www, non-www, redirects code is not written properly then website will end up in redirection loop and you need to write 

RewriteCond %{HTTP_HOST} ^website\.com RewriteRule .* http://www.%{SERVER_NAME}%{REQUEST_URI} [R,L] and force www redirection in htaccess file will fix the issue.

Also Read:

1) Change Author URL in WordPress and Base Author URL

2) WordPress Install Plugin Without FTP

3) Fix WordPress Not Working With PHP 8 Update?

4) How To Fix Error Too Many Redirects Issue In WordPress

5) How to Enable Debug Mode in WordPress

Check PHP Code Rewriting URLS

You can rewrite url with php code and if you are in wordpress and if you are rewriting urls with rewrite function then cross check with the function and make sure its working properly and if you made any new changes then revert back with previous code and choose alternative method or write rewrite code correctly.

Clear Cache of Website

If your website is having a cache mechanism and if you are on cms like wordpress, Joomla, drupal and you are using plugins, then you need to clear cache and try in a private browser and check.

Check Cloudflare CDN Interactions

If you are having cloudflare integration or any other cdn integrated on your website then cloudflare may cause this issue due to cache mechanism and you need to disable cloudflare and clear cache of the website and check with cloudflare settings.

Contact Hosting

If you are unable to fix the issue on your own, then it is suggested to contact your hosting team and ask them to look around what’s causing the issue and the server team will implement proper redirection with correct code in the htaccess file.

Fix Page Fetch info Failed: Redirect Error

0

If you are getting page fetch redirect error when performing live url test or google suddenly notifying you via email regarding page fetch redirect failed error then this means that google has encountered an issue and page fetch has been failed and the url is having redirection to another url and page fetch has been failed due to redirection here.

First you need to make sure that the url that you are fetching in google search console or requesting index is the final version of your website domain, because all domain versions of your website should redirect to one final version of the website and eventually in this case, your other domain versions, like www, non-www, www, httpS version will redirect to one final version of the domain here with 301 redirection.

When you fetch another version of your domain which is having 301 redirection then google will find the redirection here and flag it as page fetch failed: redirect error and this is normal as the url has redirect to another url of the domain.

Find Redirects of URL

There are many online tools available which can track redirections of yourwebsite and the best website to check redirections of your website is httpstatus and you need to enter website domain name here and select the check box check canonical domain check and click on check status and it will show you redirections of your website or url.

Is Page Fetch failed Redirect error Normal 

Yes! It’s normal if you are having a 301 redirect to another domain version of the website or slash at the end of url is redirecting to without slash.

Check Slash At the End of URL

There can be a difference with (slash) at the end of the url it will still have url redirection and both are treated as different urls with slash and without slash.

If you are requesting index a url or performing a live url inspection in search console with a url which is having (slash) at end of url and you are redirecting slash at end of url to without slash url then google will treat is as redirection since there is a redirection in place and you can see page fetch redirect error and this is normal and you don’t have to do anything in this case.

But you need to make sure the canonical tag is displaying correctly here with slash or without slash (final version of domain).

Also Read:

1) How To Fix a 404 Errors in Google Search Console

2) XML Sitemap couldn’t fetch error in Google Search Console

3) How to Fix Page With Redirect Error in Search Console

4) How to Fix Pages Not Indexed Status URL in Google Search Console

5) Why Page is Not Indexed: URL is Unknown to Google and How to Fix

Check if URL is Redirecting to Another URL

The URL that you are fetching in search console or live url inspection is having a 301 redirection to another url then you need to request index or perform live url inspection with the final version of url.

If you fetch a url which is having 301 redirection then it will show page fetch failed redirect error. 

Google People Also Ask showing ask a follow up feature (Bard AI)

Google recently released Gemini AI which has a next generation capabilities understanding text, images, audio and more and now google bought Gemini AI Pro to Bard and brings more experience with Gemini AI pro in bard and unlocks new features with Bard AI In Google search and new ways to create, brainstorm, Plan and do much more and ask a follow up in Google search itself which is bard AI conversation model which helps to discover and do more things with google bard chatbot.

Google Search with New Search Generative Ai features bringing users what they want to next level by introducing bard Ai in Google search and you can do more things with Bard AI like ask a follow up and have a conversation with bard ai which helps you to do many things what you want like recipes, places you want to visit, coding and many more with Bard AI.

Continue the Conversation in Google Search

Google now showing continue the conversation box and ask follow up question with your search in Google.

Ask a Follow Up Feature in Google Search

Now, it seems like Google bought Ask a follow up feature into Google Search under the People Also ask section and many users are seeing this feature new and it is not that often seen by many users in SERP.

When you click on Ask a followup feature and ask followup question it will generate your response from Bard AI into Google Search and give you Google Search Generative AI experience and it will not take you to bard google chatbot but you stay in Google search itself.

This can be one of the useful features for google users, if they want to use or ask a followup feature and get Bard AI Response here, if they want.

Most of the time google experiments things and changes google search and bard ai chat conversation or SGE (search Generative AI) is an experimental feature, then we can expect to see a lot of changes in google search with new AI features.

Ask Follow Up in Search Generative AI

When you search  something on Google, google will generate response with Google bard a (SGE) and it will generate response and show you and now with new changes made to google search, you will see Ask a follow up field or button after generative AI response in Google search and you can click on it and ask follow up response from your query and get most out of Google AI.

Why Page is Not Indexed: URL is Unknown to Google and How to Fix

0

When you are request indexing in google or performing live url inspect in google search console and your website index url status is URL is not on google and page indexed status is Page is not indexed URL is Unknown to Google in search console then you can fix this issue of page indexing in search console easily.

What Does it Mean Page Not Indexed URL  is Unknown to Google?

This means the page or url is not fetched yet and url is new – Google doesn’t know about the url.

This means that the url which you are trying to index is not known to google, google will not know the latest url that is published on Google – until it crawls urls from sitemaps or general crawls by following internal links. 

Page Not Indexed  URL Unknown to Google is Not an Error

This is not an error and this is just reporting in google search console that url is new and google did not see the url yet on your website previously.

There are many page indexing errors that will report in page indexing report Dashboard or warning that you can experience when URL is not on Google and one of the page indexing error or warning is url is unknown to google this means the url is new and google did not discover the url yet, and often happens with new urls that you publish on your website.

Why Page is not indexed: URL is unknown to Google?

If you are getting page is not indexed due to url is unknow to google then this means that Google doesn’t know about the url (page) and this can happen if you have recently published article on your website and google did not crawl that url yet. And you can update sitemaps and request indexing the url and let google know about the url and url will be crawled and indexed in Google search.

Fix Page is Not Indexed: URL is unknown to Google

You can follow these simple methods using google search console and get rid of page not indexed error url is unknown to google.

Update Sitemaps or Ping Sitemaps

You need to submit sitemaps in Google search console and update or ping sitemaps and let google know that you have a new updated url and google will discover the url and crawl it for indexing when google bot visits next time.

Also Read:

1) How to Fix Page With Redirect Error in Search Console

2) How to Fix Pages Not Indexed Status URL in Google Search Console

3) How to Fix Discovered currently not indexed in Search Console

4) Why Pages Not Indexed By Google and How to Fix

5) How To Fix a 404 Errors in Google Search Console

Request Indexing

You need to perform live url inspection and request indexing in google search console and if you see page is not indexed, the url is unknown to google then you need to click on Request Indexing and wait for google bot to discover url and crawl it for indexed. 

After Request indexing in google search console then you need to wait for a couple of hours, or days or weeks and indexing depends on a lot of ranking factors and url will be indexed in google search.

Note: Also keep in mind that, when you request indexing for url then it doesn’t speed up indexing, the url will be just added to crawling queue when google bot visit your website next time and there are certain limitation for using request indexing tool in search console and you may be get error for using request indexing too many time, try again later oops something went wrong pop up message which will prevent using search console url inspection tool .

By using the above three methods, you can easily fix a page whose URL is unknown to Google and get your page indexed in Google. 

Change Author URL in WordPress and Base Author URL

0

On your WordPress by default WordPress comes with url slug website.com /author/author-name and all author posts written by the author will be displayed here and if you want to change the author url then you can change author url (slug) by installing wordpress plugin and edit author url or author slug on wordpress website.

By default when you create author on your wordpress with username that will be the url of the author for example : if author name is admin then author url will be example.com /author/admin and you need to change this admin url or author default url slug for security reasons or any other reasons.

For many reasons you might want to change author url slug in wordpress and if you are wondering how to change author slug or url in wordpress then you need to install plugin and change author url with custom url and update author url slug in wordpress and change author base url.

Do I Need to Change the Default Author Base URL on WordPress Website?

Yes! Due to security reasons you need to change default author base url author to new one to prevent any ddos attacks or users login credentials can be stolen if there is default wordpress author url and its best practice to change all wordpress default provided options and avoid author api request as well.

Edit or Change Author URL Slug in WordPress

Follow below methods and change author url or author slug in wordpress website and change author url.

Install Plugin Edit Author Slug and Change Author URL

Step 1: Login to your WordPress dashboard with administrative privileges.

Step 2: Click on Plugins -> Click on Add New Plugin

Step 3: In Search Plugins box -> Search for Edit Author Plus OR (change author slug) and hit enter

Step 4: Find Edit  Author Plus Plugin and Click on Install Now Button and install Edit Author Plugin and once plugin gets installed -> Click on Activate and activate edit author url plugin.

Step 5: Click on Users tab in wordpress Dashboard

Step 6: Click on Edit option under username.

Step 7: Scroll down to bottom of users page and you will see edit Author slug options, where you can change author slug based on the author profile information and change author slug to with custom url slug of author.

Step 8: Select Custom box and change the author url or slug to anything you want here and click on Update Profile.

Step 9: Now, the new author url will be -> example.com /author/new-author-url.

That’s it, this is how you change author url or slug on wordpress website

Change Author Base URL in WordPress

By using edit author plus url plugin you can change author base url and you need to go to edit author url settings page and change author base url.

Step 1: Login to WordPress Dashboard with administrator privileges and Install edit author plus plugin and activate it.

Step 2: Click on Settings page in WordPress Dashboard

Step 3: Click on Edit Author Slug and Access Edit Author Slug Settings

Step 4: Under Author Base Settings -> Next to Author Base option -> Enter custom author base url and click on Save Settings.

Step 5: Author base url will be changed with new author slug ->example.com/new-author/changed-author-url-slug/ and click on save changes.

That’s it, this is how you change the base author slug of default author to new author base slug and change the author slug on the WordPress website.

WordPress Install Plugin Without FTP

0

If you are having WordPress website then you need to install plugins at some point and if you don’t have access to ftp then you can install plugin on WordPress in different ways, by using FTP and by using cPanel and by installing WordPress plugin zip folder in WordPress admin dashboard and add new plugin and install plugin on WordPress without using FTP. 

If you have not created a ftp account for your WordPress website and you want to install plugin without using ftp then you can zip plugin folder and install it using cPanel dashboard of your WordPress hosting server and by using WordPress admin dashboard by adding new plugin option.

Install WordPress Plugin Without FTP

Below are 2 methods that you can install wordpress plugin successfully without using ftp account.

Using cPanel

You need to have cpanel account access to your wordpress website to install plugins using a web hosting server cpanel account.

Step 1: Login to your cPanel account of your WordPress website.

Step 2: Download the plugin that you want to install and zip the folder.

Step 3: Click on File Manager in cPanel.

Step 4: Navigate to the path of your website and go to website/wp-content/plugin/ file location

Step 4: Once you are in /wp-content/plugin/ location -> click on upload button on top menu and click on select file to upload plugin Zip folder.

Step 5: Select the plugin zip folder and upload it using cPanel (wp-content/plugin file location).

Step 6: Once plugin folder gets uploaded -> Right click on uploaded plugin file and extract it to WordPress plugins folder location.

Step 7: Now, login to your wordpress dashboard and you will see the uploaded plugin on your wordpress plugin section and activate plugin and use plugin on your wordpress website.

Thats it, this is how you install wordpress plugin without using ftp by using cpanel of your wordpress hosting server.

Using WordPress Admin Dashboard

You can also install WordPress plugin without accessing FTP and cPanel by using WordPress dashboard plugin section and add new plugin to WordPress website.

Step 1: Login to your WordPress dashboard with administration account privileges.

Step 2: Click on Plugin Section on left side menu panel

Step 3: Click on Add New Plugin

Step 4: Click on Upload Plugin (you need to have your plugin in zip format).

Step 5: Click on Choose file and select the plugin zip folder location from your local machine and click on Install Now.

Step 6: Now, wait for the plugin to install and after the plugin successfully installs then go to the plugin section and activate the plugin in wordpress.

That’s it, this is how you upload a WordPress plugin zip folder using the WordPress admin dashboard and install WordPress plugin without using ftp or cPanel credentials.